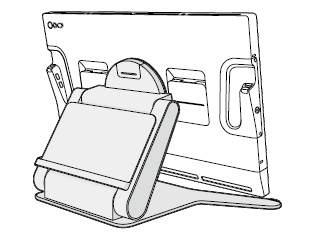
Stand setup and usage
To attach the Wacom Cintiq Pro 27 Stand, use the assembly instructions below. To attach another VESA-compliant stand, use the VESA mounting holes on the back of your Cintiq Pro.
Important: The Cintiq Pro 27 is designed to be used with Wacom Cintiq Pro 27 Stand, or another stand that complies with the 100mm x 100mm VESA standard. The Wacom Cintiq Pro 27 Stand is sold separately. Visit the Wacom eStore for more information.
Warning: Using this product without a stand may damage the ExpressKeys and cause injury due to instability during use. Please be sure to use this product with a stand as instructed.
Topics on this page
- Stand part names
- Assemble the Wacom Cintiq Pro 27 Stand
- Set the Cintiq Pro's angle and height
- Rotate your Cintiq Pro
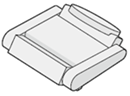
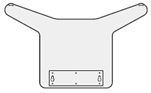
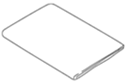
Stand part names
| A (also see Table 2) |
B (also see Table 2) |
C | D | E | F | n/a | n/a |
| Arm | Base plate | Pivot plate | Soft cloth (supplied by customer) | Arm protection bag | Fixing bracket | Screws | Hex wrench |
 |
 |
 |
 |
 |
 |
 |
 |
| A | Arm |  |
| B | Base plate | |
| 1 | Mounting cap | |
| 2 | Rotation switch | |
| 3 | Arm lock | |
| 4 | Kensington MicroSaver® 2.0 |
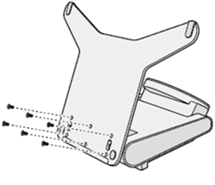
Assemble the Wacom Cintiq Pro 27 Stand
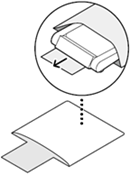
- Place a soft cloth (D - supplied by customer) on a flat surface and place your Cintiq Pro screen-down on top of the cloth.
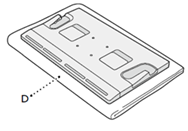
- Screw the Pivot plate (C) into the 4 VESA mounting holes on the back of your Cintiq Pro.
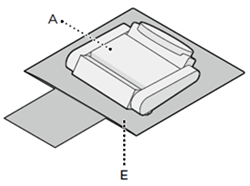
- Place the Arm protection bag (E) on a flat surface and place the Arm (A) on top of the bag.
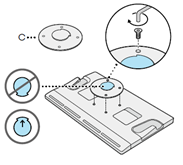
- Slide the buttons on the Arm (blue highlight) through the Base plate holes (1), then position the Base plate so that the buttons sit at the top of the Base plate holes (2). This will temporarily attach the Base plate (B) to the Arm.
- Screw the Base plate into the Arm.
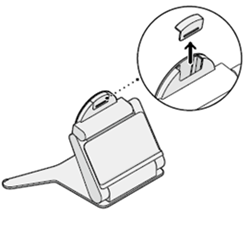
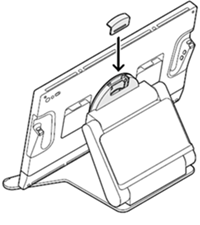
- Remove the Mounting cap from the arm.
- Slide the Pivot plate onto the arm.
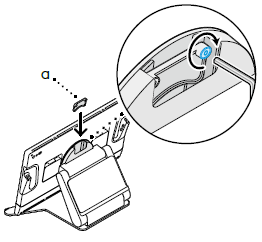
- Screw the Fixing bracket (a) into the mount.
- Re-insert the Mounting cap.
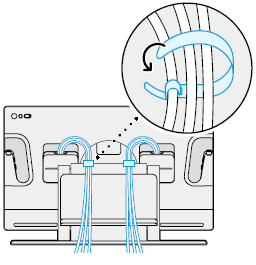
- Use the cable ties included with your Cintiq Pro to wrap the cables and thread them behind the stand.
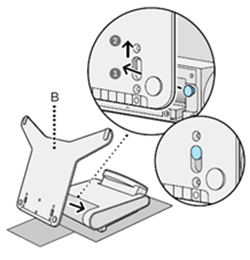

Set the Cintiq Pro's angle and height
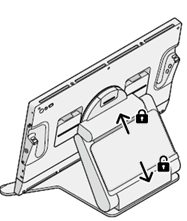
- Unlock the arm by pushing the Arm lock down.
- Optionally adjust the angle of your Cintiq Pro (up to 60 degrees).
- Lock the arm by pushing the Arm lock up.

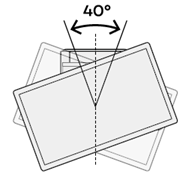
Rotate your Cintiq Pro
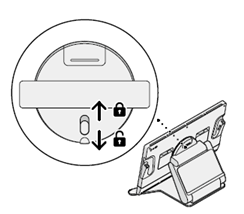
- Push the Rotation switch down to enable the rotation.
- Optionally rotate your Cintiq Pro (up to 40 degrees).
- When you return your Cintiq Pro to the upright position, push the Rotation switch up to lock it.
| | Do not share my information | | Cookies | | Terms of use | | Privacy Policy |