Display toggle
The Display toggle feature allows you to work with your Wacom device on all connected display screens, or on one display screen at a time. In Display toggle settings, you can select and deselect the display(s) to include – or exclude – in the toggle sequence.
After you select the displays that you wish to include in the Display toggle sequence, you assign "Display toggle" to a customizable component, such as a pen button. Then you can use that customizable component to toggle the pen mapping from one display to another.
Topics on this page
- Set up Display toggle
- Example: Using Display toggle
- Actions that return the toggle sequence back to a pen display
Set up Display toggle
- Open Wacom Center.
- Select your device in the Devices sidebar.
- Select Display toggle.
- Select or deselect the box next to a display screen to include or exclude it in the toggle cycle.
- Assign "Display toggle" to one of your device's customizable components, such as a pen button, ExpressKey, or On-screen shortcut. See Customize your Wacom device for detailed instructions.
- Use the customizable component you assigned to "Display toggle" in the previous step to toggle between your display screens.
- Optionally select the following feature(s), depending on whether your Wacom device is a Pen display or a Pen tablet:
Pen displays Feature Description Force Proportions Adjusts the size of the active area to maintain correct vertical and horizontal proportions between your pen display and the entire desktop or display. Depending on your settings, some portions of the pen display may not accept pen input during Display toggle. When deselected, the correct scale or proportions are not maintained. Use Inset Area Inset Area reduces the input area on your Wacom pen display so you can use shorter, more efficient pen strokes to navigate across the full width and length of your connected display(s). 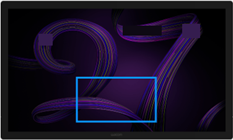
Inset Area illustration on the Display toggle settings page in Wacom Center.
Tip: To show the Inset Area illustration (image above), use Display toggle to toggle away from your Wacom pen display.Note: If both Force proportions and Use Inset Area are selected, the active area sizing may be more limited.Pen tablets Mapping Press the Mapping setup button to change the mapping for your device.
Example: Using Display toggle
The following example describes the Display toggle setup in the image below. The example assumes that the user is currently working on the Wacom One pen display and that "Display toggle" is assigned to a pen button.
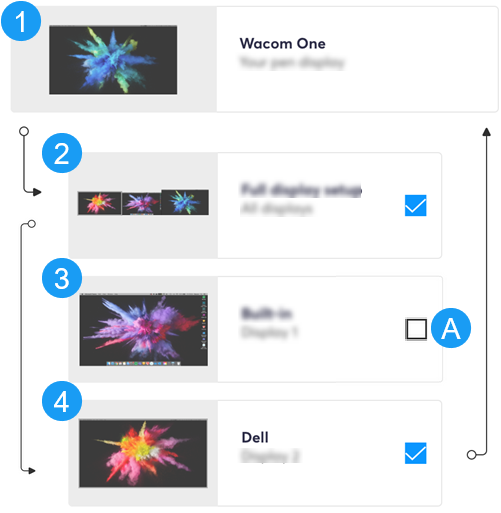 The above screenshot is for descriptive purposes; it may not match your screen. |
If the user presses the pen button assigned to "Display toggle", the pen cursor will move from the Wacom One (1) to the full display setup (2). |
| The next press of the pen button will move the pen cursor to the last display (4), skipping screen 3 because it has been excluded from the Display toggle sequence (A). | |
| One more press of the pen button will bring the pen cursor back to the Wacom One pen display (1). The cycle then repeats until a new Display toggle sequence is created. |
Actions that return the toggle sequence back to your pen display
Any of the actions listed below will return the toggle sequence to your pen display.
- Logging out of or rebooting the system.
- Switching users.
- Placing the system in sleep mode.
- Changing the resolution or number of displays on your system.
- Using the Mode Toggle... action.
- Selecting Pen Mode or Mouse Mode from On-screen shortcuts.
| | Do not share my information | | Cookies | | Terms of use | | Privacy Policy |