Connect to your computer
After you have completed step 1, check to make sure you have set up the Cintiq correctly on the stand (see Cintiq 24HD setup. Now you can complete the following steps to connect it to your computer.
The Cintiq 24HD connection cables are pre-installed.
- DVI-D. Connector located at display stand base.
- DisplayPort. Remove cover to access cable. See Cintiq 24HD cable replacement.
- VGA. Requires removal of DVI-I to DVI-D cable and replacement with the provided DVI-I to VGA cable. See Cintiq 24HD cable replacement.
- USB. Connector located at display stand base.
Select and attach video cable
- Make sure your computer meets the following requirements:
- For PC:
- DVI or VGA port.
- Available USB port.
- For Mac:
- DVI or VGA port, or appropriate Mini DisplayPort to DVI adapter.
- Available USB port.
- Turn off your computer.
- Determine if your computer has a digital (DVI) or analog (VGA) port. If your computer has only one video port, unplug your previous monitor or add a second video card. For best results, connect Cintiq to a DVI-D or DVI-I card.
- Follow the connection instructions for your video port.
Warning: Use only a power adapter specified for use with your Cintiq. Use of an improper power adapter may damage the Cintiq.
Warning: For best performance, the display refresh rate should use a vertical frequency of 60 Hz. Make sure the refresh rate does not exceed the maximum vertical frequency of 85 Hz that Cintiq supports. See the Important Product Information guide, accessible from Wacom Center, for specifications.
 A A B B |
For DVI operation, connect the DVI-D video cable connector located at the base of the Cintiq display stand to the DVI port on your computer video card. The Cintiq can be connected to either a DVI-I (A) or DVI-D (B) video card. |
 |
For DisplayPort operation, use the DisplayPort cable located in the base of the display stand.
|
 |
For VGA operation, you will need to completely remove the DVI-I to DVI-D cable and replace it with the provided DVI-I to VGA cable. See Cintiq 24HD cable replacement. |
|
If you are connecting to a Mac Mini DisplayPort, you will need an appropriate adapter. An Apple Mini DisplayPort to Dual-Link DVI Adapter is recommended. Check with your local retailer or an online outlet to purchase the cable. Connect the adapter between the DVI-D cable connector and your Mac. |
Connect the Cintiq to the computer
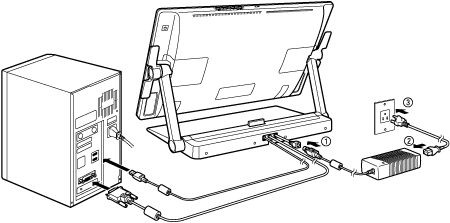
- Connect the USB cable located at the base of the Cintiq display stand to an available USB port on your computer, or on a USB hub attached to your computer. See the connection diagram.
- Connect the power adapter to the display stand extension cable for power. See the connection diagram.
- Connect the adapter power cable and plug into an AC outlet. See the connection diagram.
- Turn on the pen display. The power LED will light orange.
- Turn on your computer. The Cintiq will install as a default monitor.
- Configure the display control panel settings for the proper size and color resolution. For best results, set your Cintiq to the maximum (native) resolution of 1920x1200.
- See the Important Product Information guide, accessible from Wacom Center, for details about resolution sizes that can be used. The display size and color resolution may be constrained by the capabilities of your video card.
- For Windows: If you will be using the Cintiq as a secondary display, you may first need to enable the Cintiq in the Display properties of the Windows Control Panel.
- After the LCD monitor portion of the installation is working to your satisfaction, move on to Installing the driver.

| | Do not share my information | | Cookies | | Terms of use | | Privacy Policy |