Stand setup and usage - Part 1
Your creative pen display comes with the Cintiq display stand and a variety of accessory parts.
You can adjust the stand's vertical and horizontal position as needed to use as an easel, animator's table, drafting table, or presentation screen.
For instructions on setting up your Cintiq and stand, see Cintiq 24HD setup. For instructions on using the DVD, DisplayPort, or USB cables, see Setup - Part 2.
Display stand features
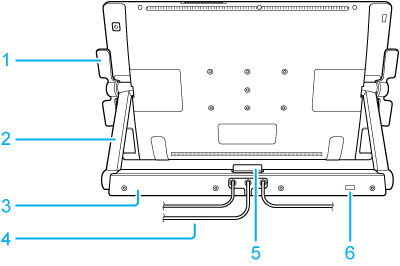
| 1 | Incline levers |
| 2 | Display support arms |
| 3 | Display stand base |
| 4 | Connection cables |
| 5 | Release latch |
| 6 | Security slot |
Adjusting display height and incline
You can use the stand to adjust the pen display height and incline to best meet your needs throughout your working day.
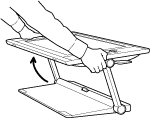
To change the incline or viewing angle:
- Face the front of the pen display and grasp it on the left and right sides at approximately the same height as the incline levers.
- Gently squeeze or pull the incline levers toward the pen display, squeezing the incline levers on both sides of the pen display at the same time. This will release a clutch mechanism. As you squeeze the levers, tilt the pen display to adjust the viewing angle.
- For a flatter incline, squeeze the lower levers and rotate Cintiq down to the desired position. For a more vertical incline, squeeze the upper levers and rotate Cintiq up to the desired position.
- To lock the incline levers in place, move them to the vertical position.
- When you have adjusted the stand to the desired position, release the incline levers to lock it in place.
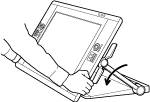
- Use the release latch to free the incline levers from a locked position.
- Pay attention to how the pen display feels as you adjust the incline or viewing angle. You may find instances where it is easier to use the upper levers instead of the lower, or vice versa.
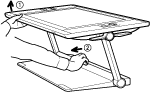
The support arms will lock in place when moved to a vertical position. To unlock the support arms:
- Use the incline levers to slightly raise the lower part of the pen display so you can access the release latch.
- Support the pen display with one hand and lift slightly. Using your other hand, pull the release latch toward you. This will unlock and release the support arms for movement.
You can extend the pen display support legs to slightly raise the pen display or allow for placement of a keyboard beneath the pen display unit. The support legs are located beneath the pen display unit, one at each lower corner. Flip out each leg, then push up slightly until it clicks into place. See Cintiq 24HD features for an illustration showing the location of the support legs.
| | Do not share my information | | Cookies | | Terms of use | | Privacy Policy |