Stand setup and usage - Part 3
You can choose to lock your Cintiq to the display stand, or mount it on an alternative stand that conforms to the VESA MIS-D 100/100 (four-screw) standard.
Locking the Cintiq to the display stand
After mounting the Cintiq on the stand, you can rotate it to a variety of positions. However, if you do not plan to rotate it, you can fasten it securely to the stand with the rotation lock screws.
Note: Required mounting screws are 4 mm wide with a 0.7 mm pitch (M4 Regular). The screw hole depth is 12 mm. Exceeding the clearance depth will damage the internal components of the Cintiq.
Note: Any platform or fixture on which Cintiq is mounted must be able to support its weight. Weight, dimensions and other product specifications are listed in the Important Product Information document, accessible from Wacom Center.
- Rotate the Cintiq to the standard landscape position (the power button will be at top of the display).
- Use a Phillips-head screwdriver to insert the lock screws and hand-tighten them. Two holes in the stand will line up with two screw holes on the Cintiq.
Attaching the Cintiq to a VESA mount
If you want to attach your Cintiq to an alternate mounting platform, you can mount it on any stand or platform conforming to the VESA MIS-D 100/100 (four-screw) standard.
Warning: When attaching the Cintiq to an alternate mounting platform, be sure to follow all instructions in the documentation supplied by the platform manufacturer. If improperly installed, the Cintiq could fall, resulting in physical injury or damage to the product.
- Turn off your computer and power off the Cintiq.
- Disconnect all cables from between the Cintiq and your computer.
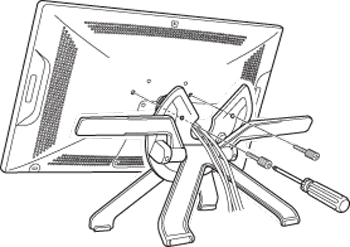
- Remove Cintiq from the display stand. Place the Cintiq face down on a flat, soft surface (such as a cloth spread across a desktop).
- Remove the bearing hub by unscrewing the four bearing hub attachment screws.
- Carefully separate the bearing halves and remove the bearing stopper to free up the cabling. Retain the small bearing stopper found within the inner groove of one of the hub sections.
- Remove screws from rear cover and lift the cover away from the Cintiq.
- Thread cables through the cable channel and reattach the rear cover, making sure to use the correct screws. The rear cover screws are shorter than the bearing hub screws.
Note: Use caution while installing the screws. Do not place excessive pressure on the Cintiq stand.
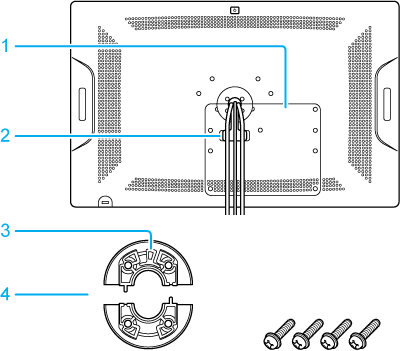
| 1 | Rear cover |
| 2 | Cable channel |
| 3 | Bearing stopper |
| 4 | Bearing hub sections, attachment screws |
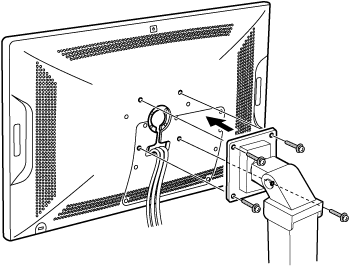
- Review the instructions that came with your stand or mounting platform, and follow all instructions carefully. Pay attention to any cautions or other safety information.
- Using the appropriate VESA mounting screws, firmly attach the Cintiq to the mounting platform.
- Reattach the cabling between the Cintiq and your computer. See Cintiq 22 setup for guidance on cabling.
Removing the Cintiq from a VESA mount
- Turn off your computer and power off Cintiq. Then disconnect all cables between Cintiq and your computer.
- Remove Cintiq from the alternate mounting platform and place it face down on a flat, soft surface (such as a cloth spread across a desktop).
- Remove the rear cover and unthread the cables from the cable channel. After freeing the cables, replace the cover.
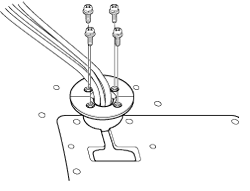
- There are four bearing hub components: two bearing hub sections, a bearing stopper, and four screws. Locate the bearing stopper within either one of the bearing hub sections. When correctly placed, the bearing stopper will shift smoothly from side to side within the stopper groove. The stopper will also sit flush with the rear hub surface.
- Position the two halves of the bearing hub together around the Cintiq cables and over their attachment points. Make sure that you do not dislodge the bearing stopper from the hub section. The section containing the bearing stopper should be positioned toward the top of the Cintiq.
- Attach the bearing hub sections to the Cintiq, making sure to use the correct screws for reattachment. (The bearing hub screws are longer than the rear cover screws.)

| | Do not share my information | | Cookies | | Terms of use | | Privacy Policy |