Test the ExpressKeys, Rocker Ring, and Touch Ring
If your ExpressKeys, Rocker Ring, or Touch Ring do not work as expected, check the assigned actions or reset them to their defaults. Also try the steps outlined on the Wacom Support page. If you are still having issues, use the diagnostic steps below.
Note: Not all devices have ExpressKeys, Rocker Rings, and/or Touch Rings.
Topics on this page
- Opening the Diagnostics dialog box
- Testing the ExpressKeys
- Testing the Rocker Ring
- Testing the Touch Ring
Opening the Diagnostics dialog box
Note: The Diagnostics dialog box shows dynamic information about the Wacom device, your tool(s), and information for touch-sensitive devices.
- Open Wacom Tablet Properties.
- Click the About button.
- In the dialog that appears, click the Diagnose... button.
- If more than one Wacom device is connected to your system, make sure the device you are testing is selected in the Device drop-down list.
- Use the information shown in the dialog to test your device and tools, as described in the help topics below.
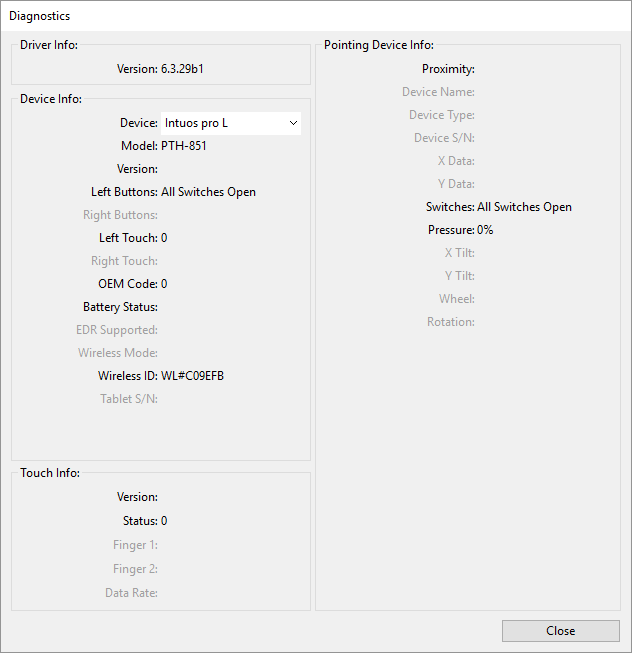
The above screenshot is for descriptive purposes; it may not match your screen.
Testing the ExpressKeys
Important: If more than one Wacom device is connected to your system, make sure the device you are testing is selected in the Device drop-down list on the Diagnostics dialog.
- With the Diagnostics dialog open, observe the Device Info column as you test each ExpressKey.
- Test the keys by pressing them one at a time. Each time you press a key, its number is shown next to the Left Buttons and Right Buttons categories, depending on your device's ExpressKeys.
- When you are done, click the Close button to exit the dialog.
Testing the Rocker Ring
Important: If more than one Wacom device is connected to your system, make sure the device you are testing is selected in the Device drop-down list on the Diagnostics dialog.
- With the Diagnostics dialog box open, observe the Device Info column as you test the Rocker Ring.
- Press each Rocker Ring position and the Center Button one at a time. The number for each one will be shown next to the Left Buttons or Right Buttons category.
- Press the Center Button and each Rocker Ring position, and verify that the action you have assigned is being performed.
- When you are done, click the Close button to exit the dialog.
Testing the Touch Ring
Important: If more than one Wacom device is connected to your system, make sure the device you are testing is selected in the Device drop-down list on the Diagnostics dialog.
- With the Diagnostics dialog box open, observe the Device Info column as you test each Touch Ring.
- Slide your finger around the entire circumference of the Touch Ring and watch the Left Touch or Right Touch number, depending on which Touch Ring you are testing.
- Press the Touch Ring mode buttons to toggle between modes, and note whether the Status LEDs illuminate. As you press each button, an overlay will appear briefly on your display screen to show the button action assignments. The button number is shown next to either the Left Buttons or Right Buttons category. If any of the functions are set to Skip, the corresponding LED will be skipped in the toggle sequence.
- When you are done, click the Close button to exit the dialog.
If these tests do not resolve the problem, please contact Wacom Support.
| | Do not share my information | | Cookies | | Terms of use | | Privacy Policy |