Connect to your computer
After you remove the DTH142E from the box and are ready to begin using it, connect it to your computer using the steps below.
Note: How you connect the DTH142E depends on whether your computer has a USB-C port that supports video output.
- If your computer has a USB-C port that supports video output:
- Connect the USB-C to C cable to the USB-C port on the top, left side of the DTH142E.
- Connect the other end of the cable into a USB-C port on your computer that supports video output.

If your computer does not have a USB-C port that supports video output:
- Connect the USB-A to C cable to the USB-C port in the middle, on the left side of the DTH142E. Insert the other end into a USB-A port on your computer.
- Connect the Mini HDMI to HDMI cable to the Mini HDMI port on the DTH142E. Insert the other end into an HDMI port on your computer.
- Connect the power cable to your DTH142E using the top port on your device. Plug the power adapter into a power source.
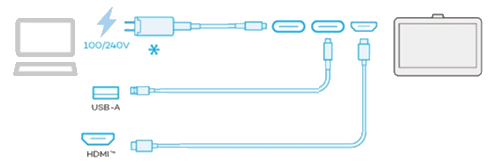
- Press the Power button to turn on the DTH142E.
- Follow the instructions on the Install the Wacom driver page.
| | Do not share my information | | Cookies | | Terms of use | | Privacy Policy |