Connect to your computer
Your creative pen display comes with the Cintiq 22 display stand attached, as well as a variety of accessory parts. For a list of the components, see About your Cintiq 22. For instructions on setting up the stand, see The Cintiq 22 stand.
When you have removed your Cintiq from the box and are ready to begin using it, complete the following steps to connect it to your computer.
Topics on this page
Attach the Video Cable
- Make sure your computer meets the following requirements:
- HDMI port (or compatible adapter)
- Available USB port
- Turn off your computer.
- Connect your device to the computer with the HDMI cable. Use the appropriate adapter if necessary.
Warning: Use only a power adapter specified for use with your Cintiq. Use of an improper power adapter may damage the Cintiq.
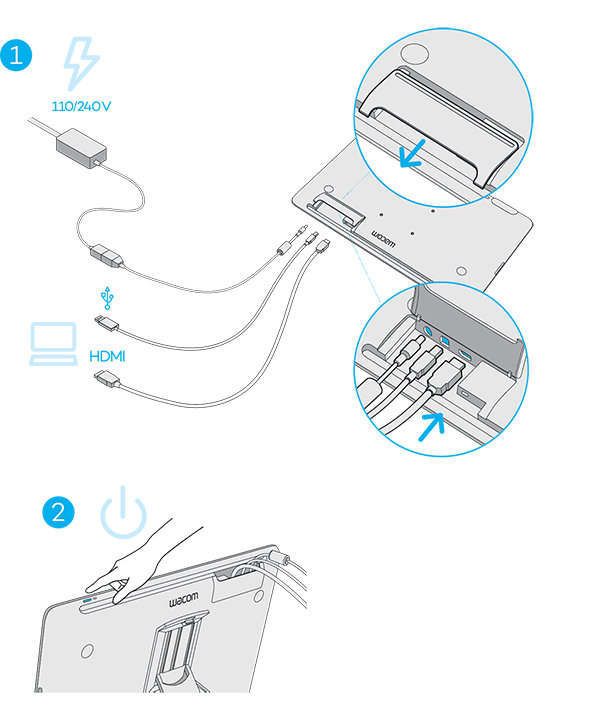
Connect the Cintiq 22 to your computer
- Remove the cable port cover to expose the cable ports.
- Push the cover up, following the directional arrows on the cover.
- Pull the cover back to expose the cable ports.
- Connect the HDMI cable to your pen display and to your computer. See Attach the Video Cable above.
- Connect the USB cable to your pen display and to your computer.
- Connect the power adapter to the Cintiq. See the connection diagram below.
- Connect the power adapter cable and plug into an AC outlet. See the connection diagram.
- Press the power button to turn on the Cintiq, and then turn on your computer.
- Follow the instructions on the Install the Wacom driver page.
Note: Display Toggle is available for use with multiple display systems. This allows you to toggle the screen cursor between the Cintiq and your other displays.
| | Do not share my information | | Cookies | | Terms of use | | Privacy Policy |