Wireless - Setup
Configure your device for wireless operation.
Warning: See the Important Product Information document, accessible from Wacom Center, for battery safety precautions.
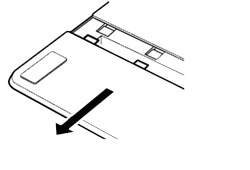
- Disconnect the USB cable and turn the device over. Remove the wireless compartment cover(s) by sliding the cover(s) away from the device body.
- Install the battery by aligning the contacts and pressing the battery into place. Note: Do not press straight down on the battery to install it. Align the contacts and press that end of the battery into place before pressing down the other end.
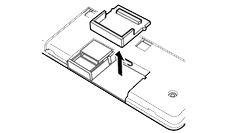
- Install the wireless module:
- Lift and remove the wireless module spacer. The location of the spacer may vary slightly, depending on the model of your Intuos.
- Save the module spacer for use as a tool for removing the wireless module.
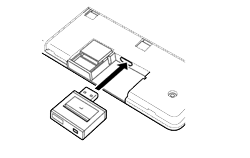
- Slide the wireless module into the device, ensuring the connector is fully seated.
- Align the wireless compartment cover and slide it into place.
- Connect the Wacom wireless receiver to an active USB port on your computer or USB hub.
Note: Medium and large Intuos Pro devices are equipped with a cover for the Wacom wireless module, and a cover for the rechargeable battery. Small Intuos Pro devices and Intuos devices have a single cover.

If you have not already done so, turn on your computer and wait until the system is ready to use. Your device should now connect wirelessly. See Wireless for wireless setup information.
To remove the wireless module:
- Turn the device over. Remove the wireless compartment cover by sliding the cover away from the device body.
- Use your thumbnail or other suitable, non-metallic tool to unseat the module. You can also use the wireless module spacer as a hook to unseat and slide the wireless module out of the device.
- Press the spacer back into the wireless module slot.
- Align the wireless compartment cover and slide it back into place.
| | Do not share my information | | Cookies | | Terms of use | | Privacy Policy |