Connect to your computer
After you have removed your Wacom Movink 13 from the box and are ready to begin using it, complete the steps below to connect to your computer. You can also reference the Quick Start Guide included in the Movink box.
Topics on this page
Connect to your computer
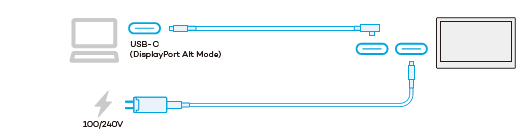
- Use the USB-C cable included in the box to attach the Movink to a computer with a USB-C port that supports video output.
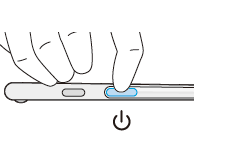
- Press the Tablet Button assigned to "Power & Menu" to turn the Movink on.
- Follow the instructions on the Install the Wacom driver page.
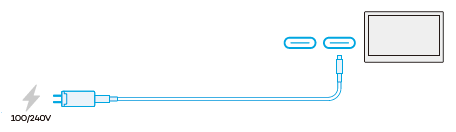
- Use the second USB-C port on the Movink to attach a USB-C cable and power adapter, available on the Wacom eStore.
Note: If your computer does not have a USB-C port that supports video output, you can use the Wacom Converter, available on the Wacom Store.

Tip: Wacom recommends plugging the L-shaped end of the USB-C cable into the left or right USB-C port on the Movink, with the cable pointing up.
Important: If the power status LED is blinking quickly (or if nothing displays on the screen) after completing the previous steps, continue with the step below to provide additional power to your Wacom device.
Connect to an Android device
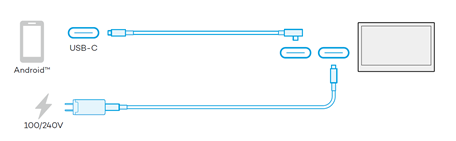
Note: When connecting to an Android device, connect the power adapter first.
- Attach a USB-C cable and power adapter, available on the Wacom eStore.
- Use the USB-C cable included in the box to attach the Movink to your Android device.
- Press the Tablet Button assigned to "Power & Menu" to turn the Movink on.
Tip: Wacom recommends plugging the L-shaped end of the USB-C cable into the left or right USB-C port on the Movink, with the cable pointing up.
| | Do not share my information | | Cookies | | Terms of use | | Privacy Policy |