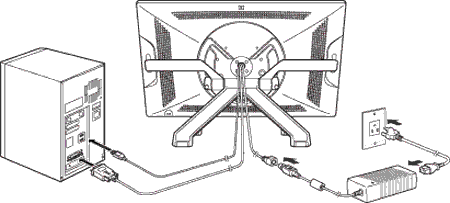
Connect to your computer
Your creative pen display comes with the Cintiq display stand and a variety of accessory parts. The product parts and accessories are packed together in the accessories box. For a list of the components, see About your Cintiq 22HD. For instructions on setting up the stand, see The Cintiq 22HD stand.
When you have removed your Cintiq from the box and are ready to begin using it, complete the following steps to connect it to your computer.
Select and attach video cable
- Make sure your computer meets the following requirements:
- For PC:
- DVI or VGA port.
- Available USB port.
- For Mac:
- DVI or VGA port, or appropriate Mini DisplayPort to DVI adapter.
- Available USB port.
- Turn off your computer.
- Determine if your computer has a digital (DVI) or analog (VGA) port. If your computer has only one video port, unplug your previous monitor or add a second video card. For best results, connect the Cintiq to a DVI-D or DVI-I card.
- Follow the connection instructions for your video port.
 |
DVI-I: Connect the Cintiq video cable located at the base of the Cintiq display stand to the DVI port located on your computer video card. |
 |
DVD-D: Connect the Cintiq video cable DVI-D connector to either a DVI-D or a DVI-I card. |
 |
VGA: For VGA operation, you will need a Wacom accessory DVI-I to VGA cable. See Ordering parts and accessories. Remove the DVI-D cable from the Cintiq and replace it with a DVI-I to VGA adapter cable. See cable removal and replacement. Connect the adapter cable between the Cintiq and the video card. |
|
If you are connecting to a Mac Mini DisplayPort, you will need an appropriate active adapter cable. Check with your local retailer or an online outlet to purchase the cable. Connect the adapter between the DVI-D end of the Cintiq video cable and your Mac. |
Connect the Cintiq to the computer
- After you have connected the video cable to your computer's video card, plug the USB connector into an available USB port on your computer, or on a USB hub attached to your computer.
- Connect the power adapter to Cintiq. See the connection diagram.
- Connect the adapter power cable and plug into an AC outlet. See the connection diagram.
- Turn on the Cintiq. The power LED will glow orange.
- Turn on your computer. The Cintiq will install as a default monitor.
- Configure the display control panel settings for the proper size and color resolution. For best results, set your Cintiq to the maximum (native) resolution of 1920x1080.
- See the Important Product Information guide, accessible from Wacom Center, for details about resolution sizes that can be used with the Cintiq. The display size and color resolution may be constrained by the capabilities of your video card.
- For Windows: If you want to use the Cintiq as a secondary display, you may need to enable the Cintiq in the Display properties of the Windows Tablet Properties.
- After the LCD monitor portion of the installation is working correctly, follow the instructions on the Install the Wacom driver page.

| | Do not share my information | | Cookies | | Terms of use | | Privacy Policy |